Viewing and Editing the Chart of Accounts
The chart of accounts, also known as the account tree, is a comprehensive guide that contains all accounting transactions categorized according to appropriate classifications. Its importance lies in the fact that all financial reports and statements are built upon it.
The chart of accounts consists of hierarchical levels, starting with main accounts, followed by sub-accounts, and then more specific sub-accounts.
For example, the code for assets is (1), which is a primary account that includes a main account called current assets with the code (11), and under current assets, there is the cash account with the code (111), and so on.
The system’s chart of accounts comes pre-configured and ready for immediate use, and you can make the desired modifications to suit the nature of your business.
Viewing the Chart of Accounts in Enerpize
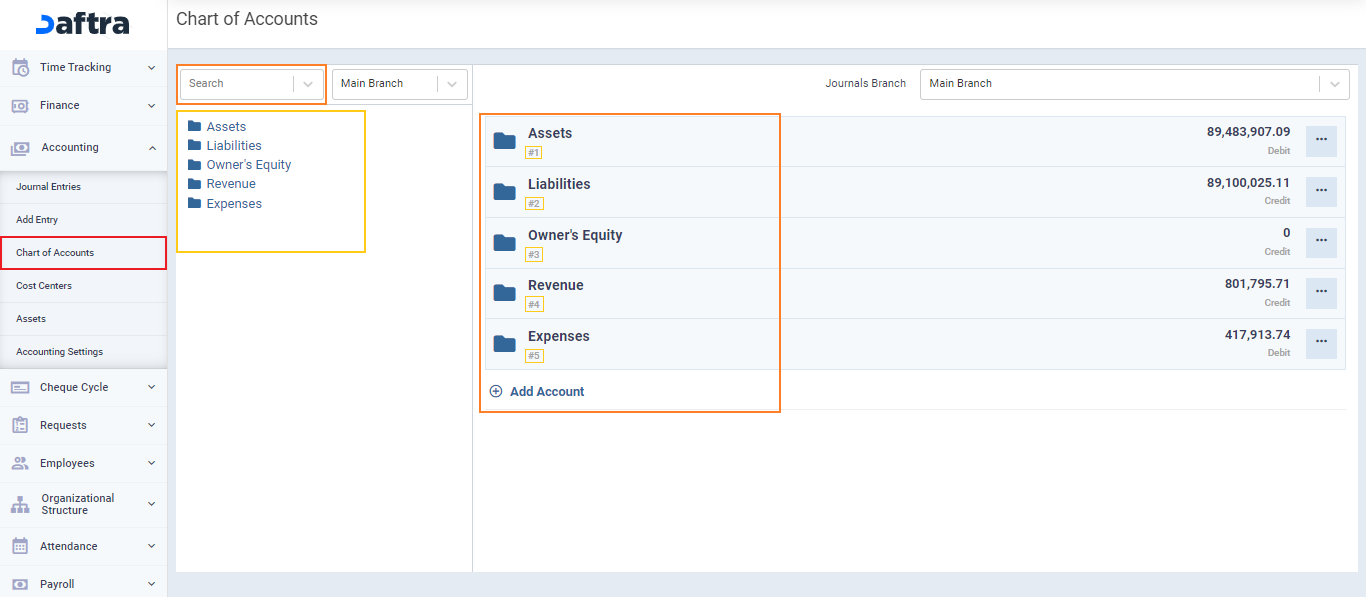
Click on “Chart of Accounts” from the “Accounting” dropdown menu in the main menu to find the chart of accounts displayed. The tree structure will appear on the left side, and the balances of the main and sub-accounts will appear on the right side.
The chart consists of five main accounts, which are as follows:
- Assets with the code (1).
- Liabilities with the code (2).
- Owner’s Equity with the code (3).
- Revenues with the code (4).
- Expenses with the code (5).
These main accounts branch into sub-accounts that you can view by clicking on them. You can also reach the desired accounts using the search field.
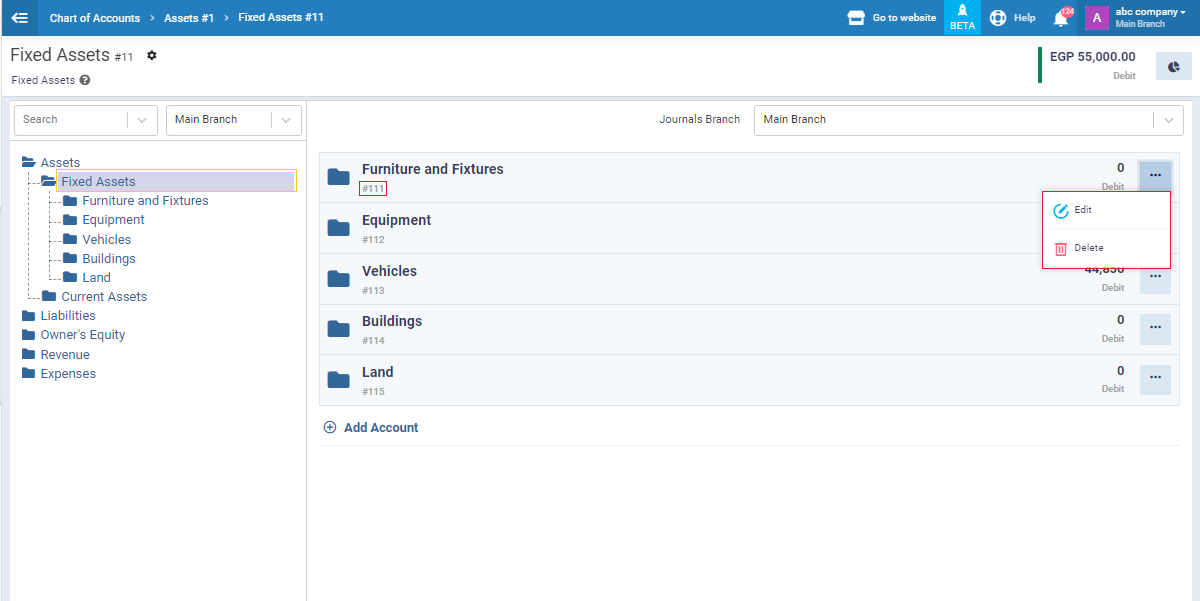
For example, when clicking on Assets, the Fixed Assets account with code (11) and the Current Assets account with code (12) will appear.

When clicking on Fixed Assets, the sub-accounts under it will appear. By clicking on the three dots next to these accounts, you can edit or delete them if the account is not used in your business activity, provided that the account you want to delete does not contain any accounting transactions.
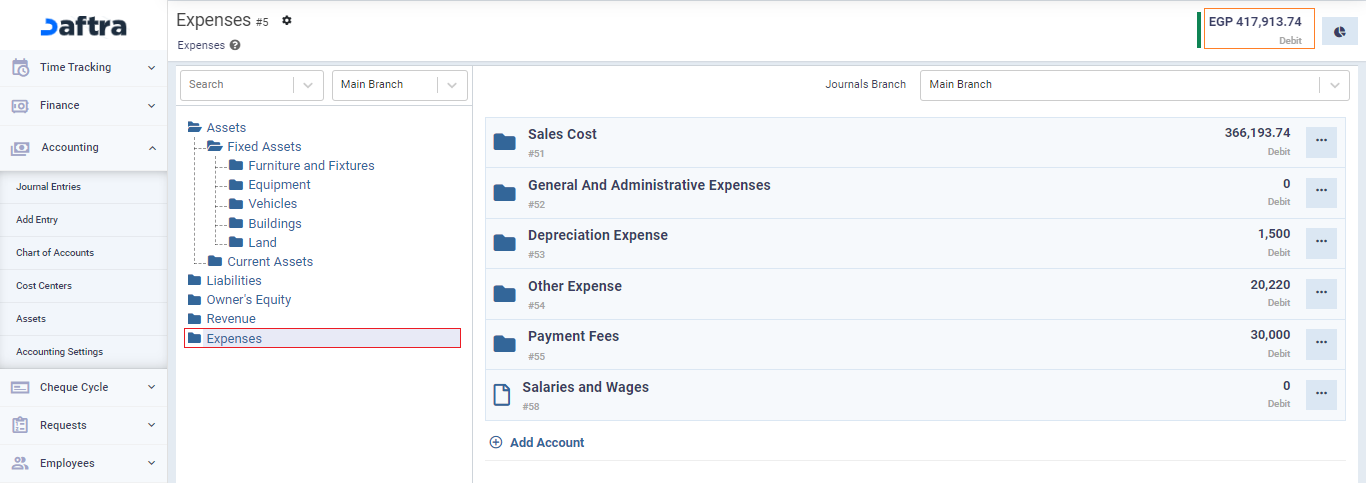
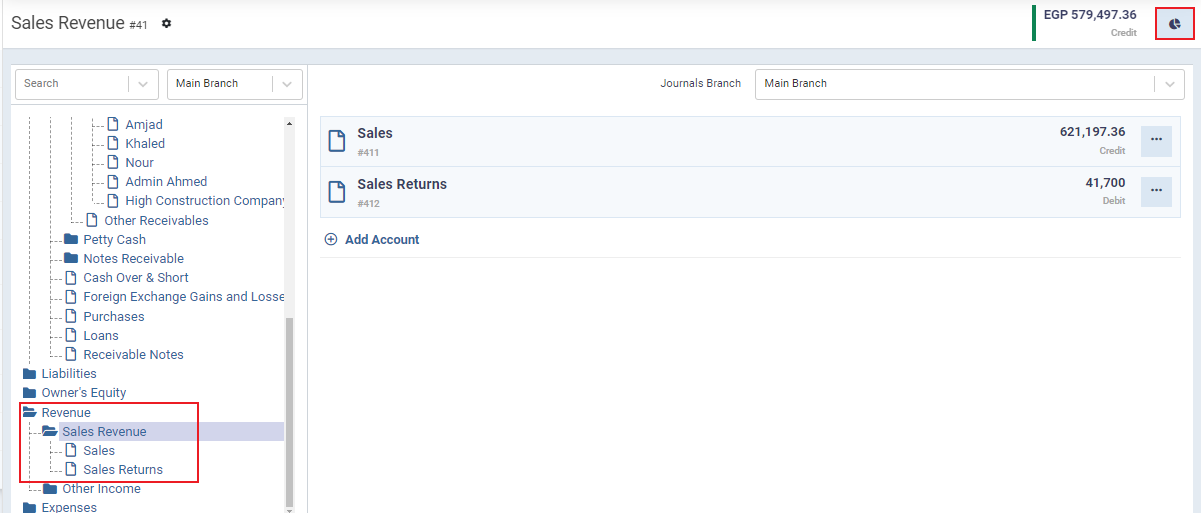
You can also view the debts of each sub-account individually next to the account or the total debts of a main account at the top right of the account, whether the account is a debtor or a creditor.
What is the Difference Between Basic, Main, and Sub-Accounts in the Chart of Accounts?
There are five basic accounts:
- Assets
- Liabilities
- Owner’s Equity
- Revenues
- Expenses
These five accounts branch into other accounts, which can be either main or sub-accounts. So, what is the difference between them?
Main Accounts
- Icon: Resemble a folder (🗂️).
- Characteristics: Contain several main accounts within them.
- Flexibility: You can easily add sub-accounts within a main account and edit it.
Sub-Accounts:
- Icon: Resemble a file (📄).
- Characteristics: Cannot have other accounts branching from them.
- Flexibility: You can edit them and assign a cost center to them.
- Usage: They are selected when directing your accounting transactions, where account balances are recorded.
Editing the Chart of Accounts
You can view or edit the five basic accounts by clicking on the settings icon (⚙️) next to the name of the main account.
In the case of editing, you can control certain details such as:
- Name
- Code
- (Type) Nature of the account: whether it is a debtor or a creditor
When viewing the basic account, you will find its details and a summary of its use in the chart of accounts and associated accounting activities.
By clicking on the three dots next to any main or sub-account, you can also edit some of its details, such as:
- Name
- Code
- (Type) Nature of the account: whether it is a debtor or a creditor.
- Changing the main account to which this account belongs
Adding a New Account in the Chart of Accounts
You cannot add a new basic account beyond the five basic accounts in the chart of accounts, but you can add main and sub-accounts under them.
To do so, go to the “Chart of Accounts“,
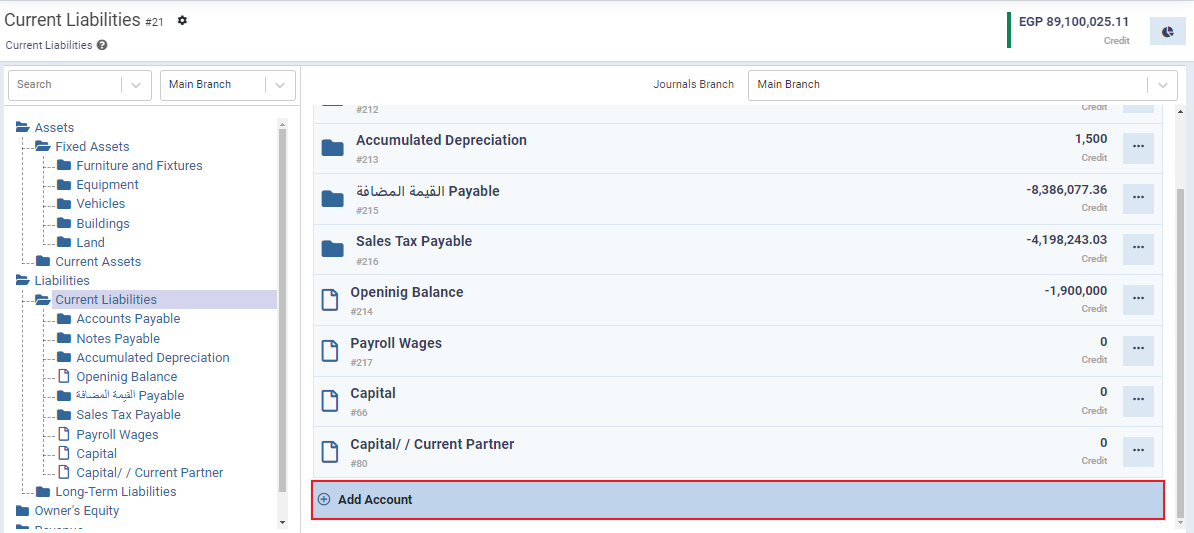
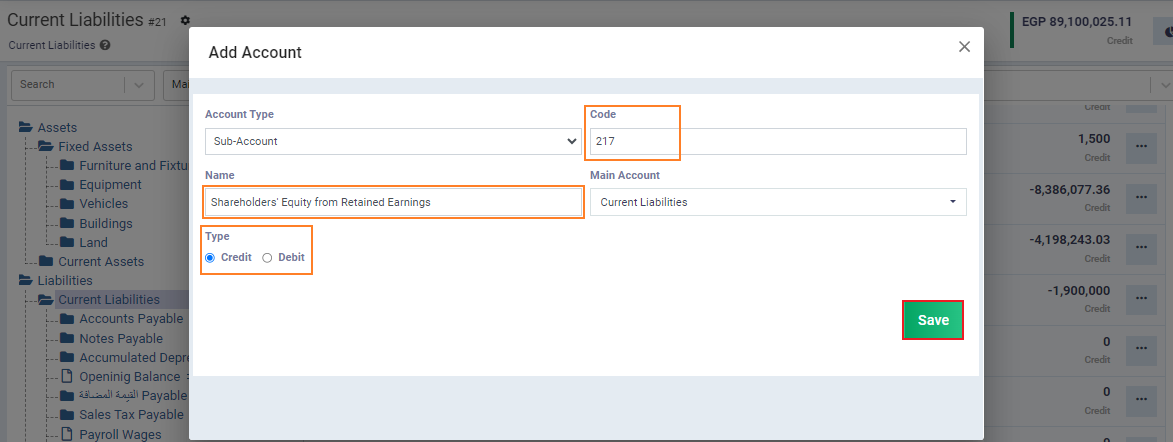
Open the account to which you want to add the new account, then click on the “Add Account” button.
Enter the details for the account you want to add to the chart of accounts:
- Account Type: Specify the type of account:
Sub-Account (will not have any accounts branching from it).
Main Account (can have accounts branching from it). - Code: Assign a code for the new account.
- Note: The code must be unique and cannot duplicate any existing codes for sub-accounts or main accounts in the chart.
- Name: Enter the desired name for the account.
- Main Account: Specify the main account under which the new account will be listed.
- Type: Determine the nature of the account “Debtor” or “Creditor“.
Save: Click the “Save” button.
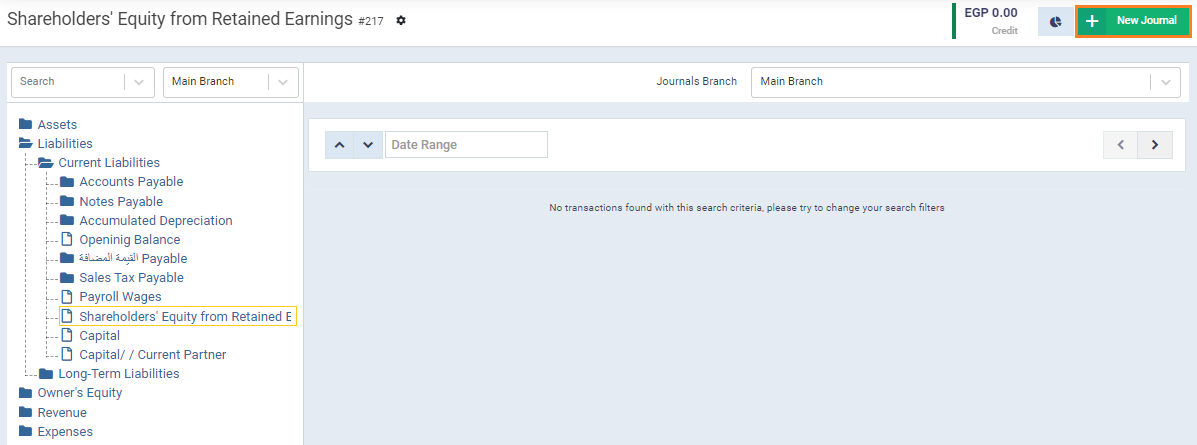
After adding the new account, you will find it in the chart of accounts. You can assign it when adding a new journal entry or when directing any accounting transaction within the system.
Assigning a Cost Center to an Account
Cost centers are assigned to sub-accounts that do not have other accounts branching from them. By linking a cost center to this account, any journal entry or accounting transaction added to this account can be automatically linked to the assigned cost center if desired.
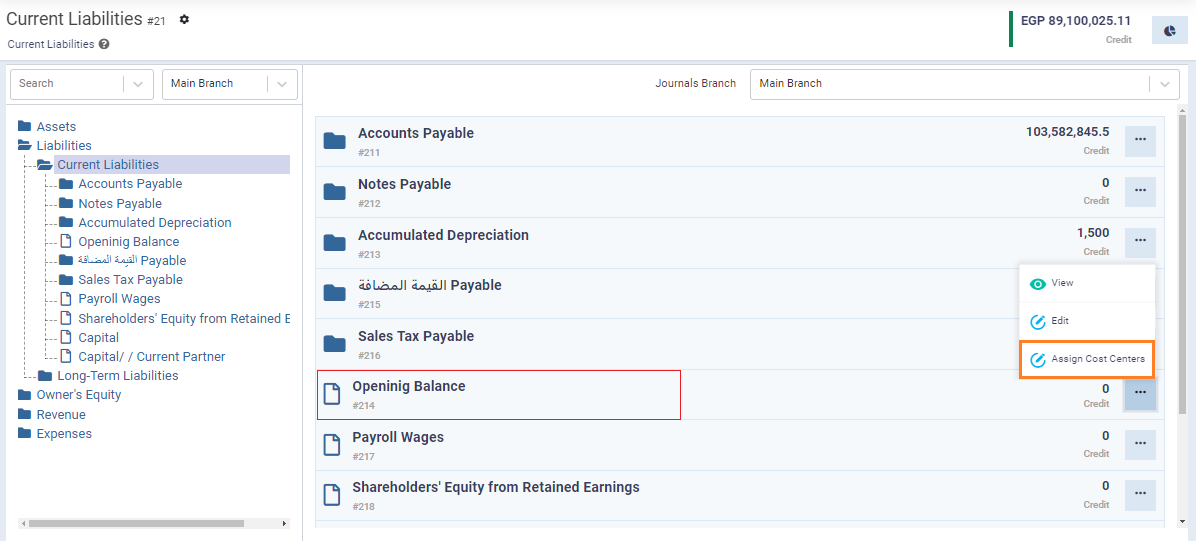
To assign a cost center, click on the desired account,
click on the three dots next to the account,
Select “Assign Cost Centers,” then choose the desired cost center, specify its percentage, and indicate whether you want the linking to be automatic or not.
Which accounts are automatically added to the chart of accounts?
There are some accounts in the system that you don’t need to add manually to the chart of accounts, as they are automatically added when created in their designated location. For example, when adding a client named “Client 1” from the Clients page in Enerpize, an account is created under Receivables under Current Assets in Enerpize called “Client 1,” and the related accounts are automatically balanced in its account. Automatic registration of accounts in the chart of accounts is not limited to clients only, but it also includes:
- Clients
- Suppliers
- Treasuries and bank accounts
- Warehouses
- Assets and taxes
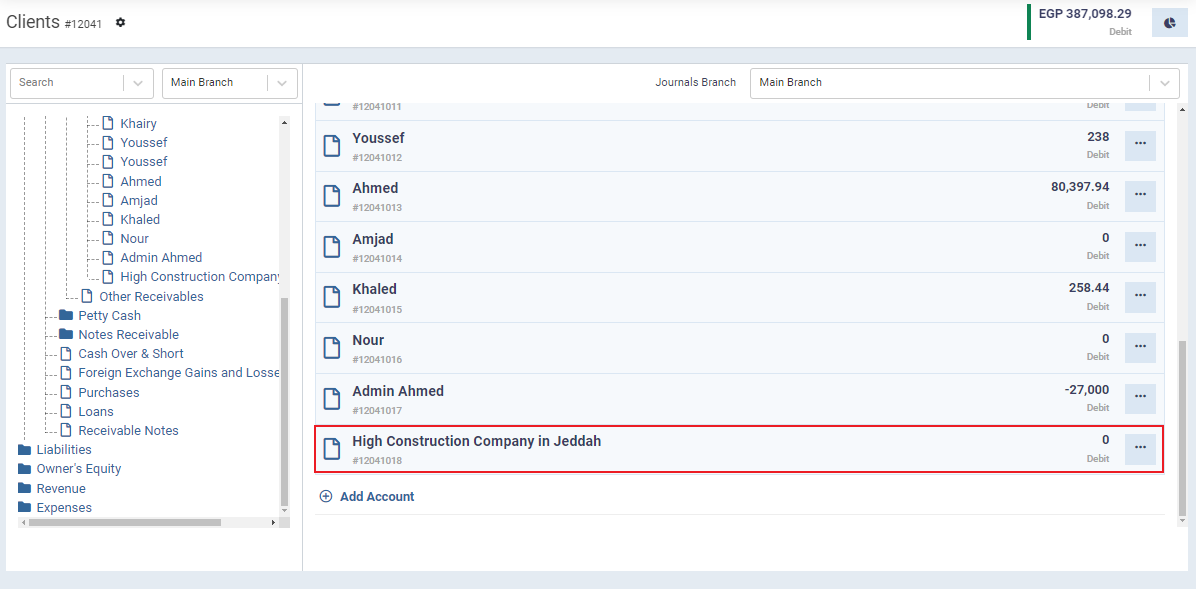
Click on “Add New Client” under “Clients” in the main menu and add the client “High Construction Company in Jeddah.”
.
You will find that an account has been automatically created in the chart of accounts with the name of this client.
Chart of Accounts Reports
You can view a report for the entire chart of accounts or a specific account within it. To view a report for a specific account, open that account in the chart of accounts tree and then click on the reports icon at the top.
Set the report settings, such as the desired period, and then click on the “View Report” button.
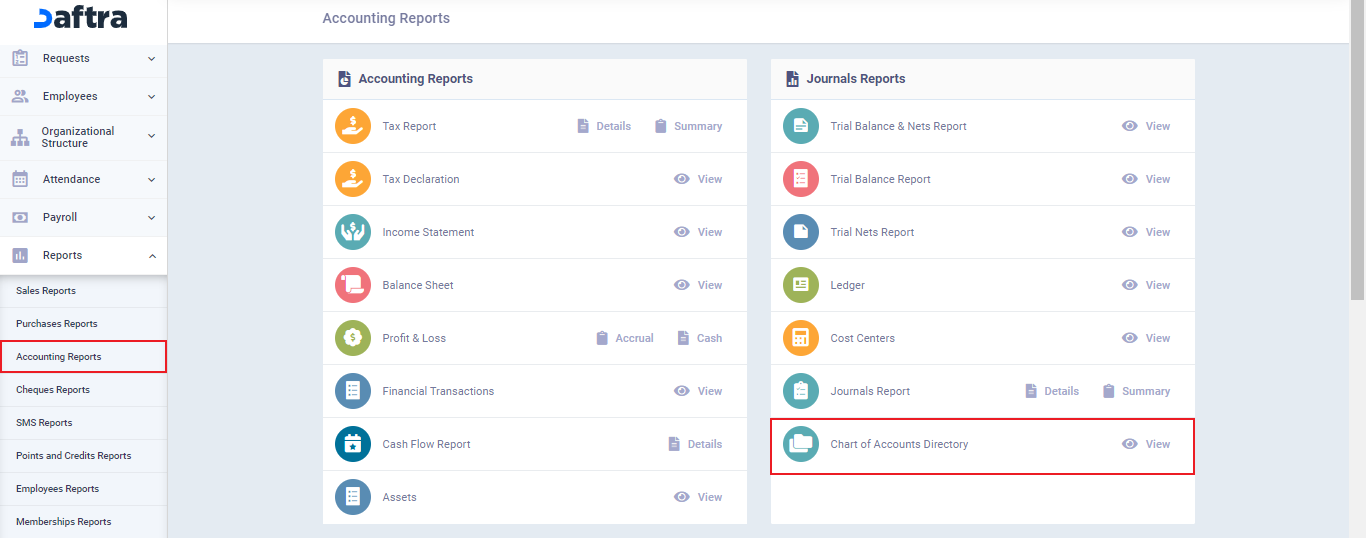
To view a comprehensive report of all the accounts in the chart, click on “Accounting Reports” under “Reports” in the main menu, and then click on “Chart of Accounts Directory.”
Then click on the “View” button and follow the same procedure for displaying partial reports for any specific account in the chart.

