Adding Opening Balance to Inventory
What are opening balances for inventory?
The opening balances for inventory are the quantities of products carried over at the beginning of the year/financial period from a previous financial period.
Note:
Steps to Add Opening Inventory Balance
- From the main menu click on “Inventory“
- Click on “Manage Requisitions“
- Click on the button “Add“
- Choose from the dropdown menu “Manual Inbound“
- To complete the process enter the following data:
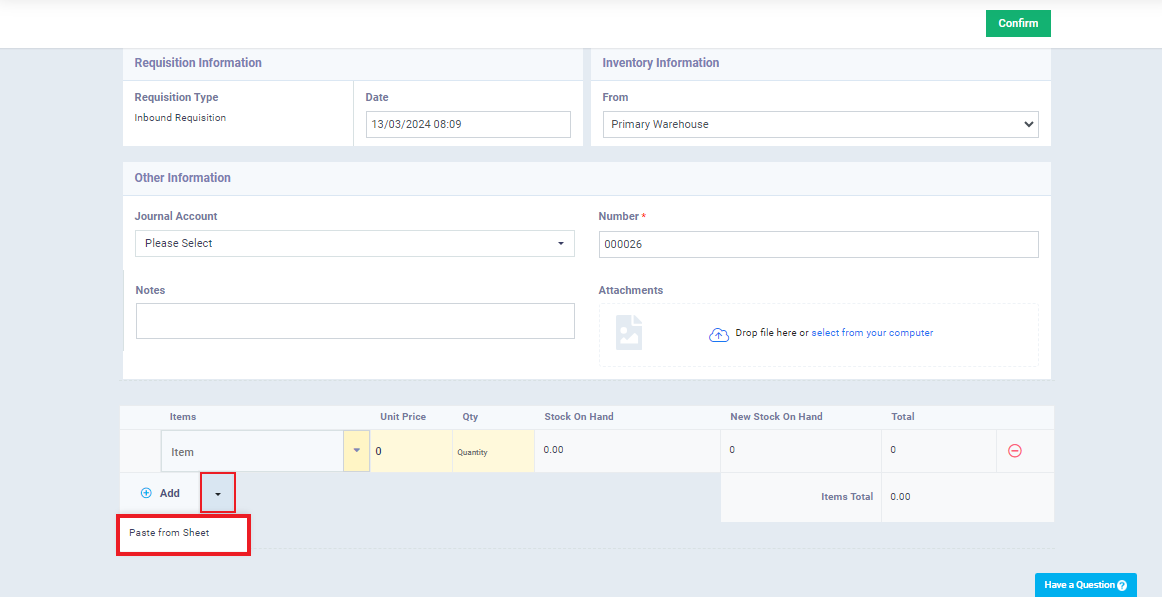
- Requisition Information:
- Date: Set the date of adding the opening balance and the time of saving the transaction to the account.
- Inventory Information
- Warehouse: Specify the warehouse to which the opening balance was added from the dropdown menu.
- Note: To display the warehouse selection option, there must be more than one warehouse in the account. For further info, refer to the “Adding a new warehouse” guide.
- Warehouse: Specify the warehouse to which the opening balance was added from the dropdown menu.
- Other Information:
- Journal Account: Select the account affected by the transaction against the inventory value.
- Notes:
- To display the journal account list, “Chart of Accounts and Journal Entries” must be activated in the account. For more details, refer to the “Enable the chart of accounts app“ guide.
- Notes:
- Notes: Add any required notes in the box.
- Journal Account: Select the account affected by the transaction against the inventory value.
- Items:
- Items: Select from the dropdown menu the items for which opening balances need to be added.
- Unit Price: Specify the cost price of the product, along with selecting the currency.
- Quantity: Specify the product quantity.
- Stock on Hand: The system will show you the quantity of the product in the warehouse before the transaction is made.
- New Stock on Hand: The system will show you the quantity of the product in the warehouse after the transaction is made.
- Total: The system will display the total price according to the quantity of the product.
- Requisition Information:
- Click on “Confirm“
Paste from Sheet
- The software provides a ‘Paste from Sheet’ feature, which allows you to copy product data intended for adding opening balances through a separate Excel file and paste that data into the program.
- You can use this feature if you have an external file containing the product data for which you want to add opening balances.
Steps to paste data from sheet
- Note: First, make sure to add product data in an Excel file and ensure that the “Name / Item Code” in the Excel file matches what is in Enerpize.
- After entering the “Manual Inbound” page as explained in the steps above, you must complete the following steps:
- Click on the arrow next to the “Add” field located below the item.
- Click on “Paste from sheet“
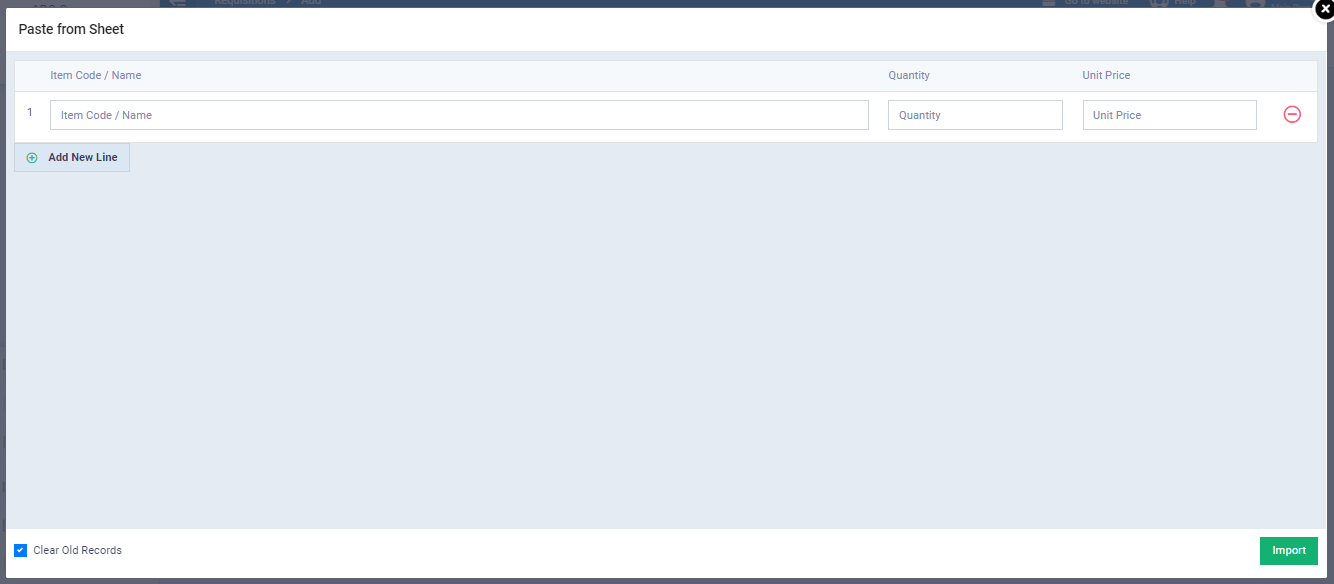
- A table containing the following data will appear, which you should add by copying from the Excel file:
- “Name / Item Code“: Copy the data from the “Name / Item Code” column in the Excel file and paste it into this column.
- “Quantity“: Copy the data from the “Quantity” column in the Excel file and paste it into this column.
- “Unit Price“: Copy the data from the “Unit Price” column in the Excel file and paste it into this column.
- “Clear Old Records“: If you click on this field, any manually entered data before importing data will be erased.
- Click on “Import” to add the data to the table on the entry page.
- After adding the data to the page and ensuring its accuracy and compliance,
- You can copy an entire column from the Excel file and then paste it into the first field of the corresponding column in the program, and all column data will be automatically added.
- In case of a mismatch in the data during the “Paste from sheet” process, the data will not be imported until it is fully matched.


